Showing posts with label How to Recipies. Show all posts

How to install Windows 7 using Pen Drive

Apr 14, 2010

And no! I am not going to talk about some geeky command prompt method, this method is as easy as plug and play. Microsoft has recently released a utility to do the job.
Microsoft released a small utility to create Windows 7 bootable USB/DVD called “Windows 7 USB/DVD Download Tool

We have cover a small How To on how to use it.
  • First Download and Install Windows 7 USB/DVD Download Tool.
  • Now when you launch it, it will ask for Widows 7 ISO file, here select the path where you have stored Windows 7 ISO file
Selecting Windows 7 ISO Image using How to install Windows 7 using
 Pen Drive
  • In step 2 select USB to create a boot able USB flash drive or DVD to create a bootable DVD disk, then click Next.
Win 7 USB 03 How to install Windows 7 using Pen Drive
  • If you want to create a boot able USB flash drive, select your USB device in the dropdown list and click Begin Copying or if you want to create a boot able DVD, click Begin burning.
Win 7 USB 04 How to install Windows 7 using Pen Drive
  • If you choose to create a boot able USB then click on “Begin Copying” button. Now you’ll be prompted to format the USB device. In the dilog box Click Erase USB Device.
That’s it. Now the Copying Process will begin and you will have a Boot able USB at last.
A note for Developers. For all developers you would be glad to know that this tool is Open Source and you can view and optimize it.
Download How to install Windows 7 using Pen Drive HomePage More 
Information
For Windows XP Users
The following applications must be installed prior to installing the tool:
  • Microsoft .NET Framework v2 must be installed. Download
  • Microsoft Image Mastering API v2 must be installed. Download
System Requirements
  • Windows XP SP2, Windows Vista, or Windows 7 (32-bit or 64-bit)
  • Pentium 233-megahertz (MHz) processor or faster (300 MHz is recommended)
  • 50MB of free space on your hard drive
  • DVD-R drive or 4GB removable USB flash drive
READ MORE - How to install Windows 7 using Pen Drive

Disable “Solve PC Issues” Notification Messages in Windows 7

Sometime back I have written a post on What is the Windows Experience Index and How To tweak it and following it with lots of Windows 7 related hacking and tweaking tutorials. I added another article which was quite very popular ie How To Format USB drive into NTFS format to make complete use of USB Space. Now today again I am writing on my favorite topic Windows 7 tweaking. 

Solve PC Issues - It is the functionality added by Microsoft Windows 7 which helps you to solve your PC related problem, it is a part of Windows Error Reporting.
Whenever there is a problem or error in your PC your System generates the error and notifies you by showing the error at your Notification bar.  Well it is always recommended to have this option Up and running but some user don’t feels the same, even i too get annoyed when I disable my Windows Update or Firewall and then it gives error that your Windows Update and Firewall is disabled please Enable it. OK till now its kind of good but I get error message like Back Up your system etc, than I feel its time to either Solve those errors or if you don’t want to do that than its better to disable them.

How To disable these error warnings?
There are two ways of doing it, first is you can either completely disable the notification (not recommended) or you can just disable the notifications of particular errors.
Completely Disabling Error Notification
For Completely disabling error notification do the following steps.
1. Press WIN + R and type regedit in the Run dialog box, press Enter.
2. Now navigate to:
HKEY_CURRENT_USER\Software\Microsoft\Windows\Windows Error Reporting

regedit solve pc

3. In the right hand side double click on DWORD value named Disabled and change its value to 1.

value error

4. That’s it, now Log off your system and Log in back.
Now there will be no more Solve PC Error notifications bugging you.

Disable particular errors only
As I said, you can have another option by which you can just disable those errors which you don’t want to see like Back Up notification, Windows Update etc. So for that open your Notification Menu by clicking on the UP arrow on the taskbar and click on Crossed Flag button on it.

solve pc

As soon as you click on it you will see list of errors causing problems/notifications.

4 
error

As you can see in the Image above I am getting 4 errors Update Windows Defender, Turn on Firewall, Potentially harmful software detected and Windows Backup, these errors are self explanatory. Now say I don’t want to see Set up backup error on this notification list, than all I have to do is click on Open Action Center.

error WAC
 
You can turn off any message/notification from here, just click on Turn Off message about Windows Backup to disable message about windows backup. Similarly you can do the same for all other error messages and warnings.
READ MORE - Disable “Solve PC Issues” Notification Messages in Windows 7

Tweaking: Edit Firefox Context Menu

Feb 27, 2010

You can customize Firefox menu by using 3rd party tools but if you want to tweak menus yourself than the following tutorial is for you.
You can tweak your menus using userChrome.css file. userChrome.css is a CSS file that can be used to change the way Mozilla Firefox interface look. But to edit it you need to locate it first. 

For Windows XP users:
C:\Documents and Settings\\Application Data\Mozilla\Firefox\Profiles\
For Windows Vista and Seven Users:
C:\Users\\AppData\Roaming\Mozilla\Firefox\Profiles\
Or
  1. Press WIN + R and type %Appdata%
  2. Then navigate to Mozilla\Firefox\Profiles\lpg7v146.default\chrome
  3. Here create a file named “userChrome.css”
In this tutorial I will show you how you can Hide Menu items from the context menu.
In the userChrome.css file add a line like this to hide any menu item:
#id1, #id2 { display:none !important; }
replacing each of the identifiers #id1, #id2, … with one of the selectors from UserChrome.css IDs.
Example (hides the “View Background” menu item and the horizontal line after it):
#context-viewbgimage,
#context-sep-viewbgimage {
display: none !important;
}
So by using this method you can hide any menu item that you want, lets take one more example. Lets hide the Open Link in New Window menu item.
#context-openlink
{
display: none !important;
}
That’s it now restart your firefox and the Open Link In New Windows menu item will be gone.
Reset To Default:
If something went wrong or at some stage you want to revert back all the changes than simply delete the file userChrome.css
READ MORE - Tweaking: Edit Firefox Context Menu

Update Your Computer's Drivers With Driver Access

Feb 10, 2010

If you are looking for updating your drivers, but don't know where to find out than i have a tool waiting for you that is Driver Access

You can either waste a long time searching for drivers or you have an option to use Driver Access, Driver Access automatically updates your computer with the latest version windows drivers that are 100% compliant with your system in just under 2 minutes.


Driver Access has a database of million of drivers, whether it is sound driver or video driver. This will update your drivers on the go, in just 2 minute.

Requirement:
Windows 7, Vista, XP Pro, XP Home, 2008 and 2008 R2 Server, 2003, Server, 2000 in 32 bit or 64 bit Editions.
  • 300MHz or higher processor
  • 256 MB or RAM
  • 22 MB of hard disk space
So start your driver download now
READ MORE - Update Your Computer's Drivers With Driver Access

Add PayPal donate button on your website

Jan 31, 2010

Now since you have verified your Paypal account its time for exploring some more options of it, one of the option is to add a Donation Button. This button helps webmasters to earn some bucks by getting donations from there visitors.
By following the below steps you can easily add a Donate button in your website.

Step 1.Login to PayPal and click on ‘Merchant Services’ link shown in Navigation Bar.
Step 2. Now Scroll Down to PayPal Website Payments Standard and in Key features Box click on ‘Donation’
Step 3. Now you will reach to Create PayPal payment button page. Fill necessary information in step 1 of this page. In Transaction Notificationselect Use my PayPal email address.
READ MORE - Add PayPal donate button on your website

What is Google Public DNS?

Jan 6, 2010

Google Public DNS is a free, global Domain Name System (DNS) resolution service, that you can use as an alternative to your current DNS provider.
Got Confused…Ok let me explain this is in simple non technical terms (as far as I can). You use Internet right. So how do you access any website, by entering its domain name like www.beingpc.com in any of your favorite browser and hitting enter. But the inside story is different.
When you try to access any webpage in our case www.beingpc.com your computer resolves this domain name (website URL) into IP Address with the help of the Domain Name Server. By default, Windows uses your ISP’s DNS server.
So in short, to open a website Windows need to resolve the domain name to IP Address by looking it in Domain Server provided by your ISP. So the faster your PC resolve the faster you get connected. So this is where Google Public DNS helps, it helps you resolves the domain names into IP Address faster than other.
More Detailed Explanation
Performance comparison of OpenDNS and Google DNS

Setup Google DNS on your Computer
If you would like to setup Google DNS on your Computer than follow the steps below:
Go to Start > Control Panel
Select Network And Internet > Network & Sharing Center
In the left pane click on Change Adapter Settings
Right Click on Local Area Connections and select properties
Adapter setting
Adapter setting
Select Internet Protocol Version 4 and click on Properties
TCp IP properties
Now set the Ip Addresses as below

Read More
READ MORE - What is Google Public DNS?

Windows XP Quick Launch in Windows 7

Jan 4, 2010

I got a mail last night from one of beingPC reader he asked me that his he has Upgraded his system from XP to 7 and now his Quick launch bar is missing in Windows 7, how can he get it back? Truly saying I have never used Quick launch bar, in XP days but I don know about it. So I go to my Windows 7 task bar right clicked on it and go to toolbar option but I didn’t found Quick launch toolbar.
If you want to get back Show Desktop Icon in your taskbar than follow our Handy Shortcut Creator Tool - Created by me.
Then I Googled and found that Quick launch Bar is not available in Windows 7, so how should I get it back. I have visited a lot of post but most of them are buggy so after trying for 15 minutes now I am able to have a Quick launch Bar on my PC (though I am not going to use it anyway), So here are the steps that I followed to get back my Quick Launch Bar
quick launch bar
  1. Right-click on the taskbar and choose the Toolbars and add a New toolbar. (This will open a Choose a folder dialog to choose a directory that will be displayed as the toolbar.)
  2. Goto %appdata%\Microsoft\Internet Explorer (just copy/paste and hit enter)
  3. Now create a folder Quick Launch under this folder and use that as the directory for the new toolbar and click OK. (may be you will find Quick launch Folder already in there so in that case no need to create another just use that one only)
  4. Thats it, you have just created a quick launh toolbar, you can see it in right corner of the taskbar right next to the system tray.
  5. And you have your Quick Launch back…
toolbar
Note: If you like this post you may want to subscribe to our newsletter
READ MORE - Windows XP Quick Launch in Windows 7

How to set Firefox to open in Private Mode by default

Dec 22, 2009

In my last post I have told you how to disable InPrivate browsing form Internet Explorer, in today’s post I will tell you how to open Firefox in Private mode by default.

Well you can always start Private mode by goint to Tools > Start Private Browsing or by simply pressing CTRL + SHIFT + P shortcut key. But for users who always want to surf in Private Mode (What is Private Mode?) here is a simple trick that will open Firefox in private mode by default.

Just follow the below steps to make Private Mode as default Mode in your Firefox.

Start Firefox and type about:config in the address bar and press Enter.
Now press the I’ll be careful, I Promise button on the Warning page

Continue reading
READ MORE - How to set Firefox to open in Private Mode by default

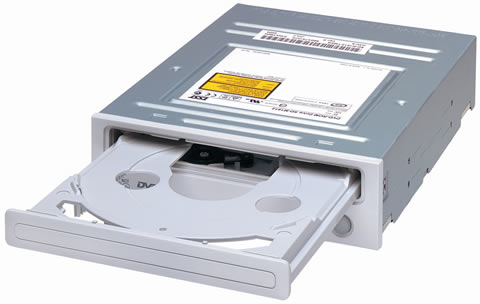
Make Your CD-ROM Read DVD's

Oct 19, 2009

Make Your CD-ROM \ CD-RW To Read DVD’s To Watch Movies

[MOD YOUR CD-ROM]

There Are Two Types Of CD-ROMS That Can Be Modded
1) 24x – 40x
2) 40x – 52x

Drives From 2x – 24x Are Too Old, So They Cannot Be Modded

We Have To Go With Laser Head Adjustment

The Track Pitch Of CD’s Is 1.6 microns & The Tracjk Pitch Of DVD’s, The Minimum Length Of Track Pitch Of CD’s Is 0.843mm & The Minimum Length Of Track Pitch Of DVD’s Is 0.293mm, As-a-result DVD’s Can Store Much More Data In The Size Of A CD.Now We Need To Adjust The Laser Head So That It Can Read Discs With Shorter Track Pich.

Lets Start


Open Up The CD-ROM / CD-RW, You See The Lense On The Rail This Is The Laser Head, On The Side Of The Laser Head There Is A Screw You Can Adjust [This Is The Master Key For This MOD]

This Screw Adjusts The Size Of The Laser Beam That Lands On The Disc, The Laserbeam Should Be Less Than 0.293mm, To Read The DVD’s, To Do This Turn The Screw 2 – 3 Times, I Got This Number After Lot Of Trials [Don’t Forget How Many Times You Have Turned The Screw] [Safer Way : Keep A Note Of It]

Now We Go With Speed Adjustment

DVD-ROM Plays DVD’s Smoothly At 4x Speed, Now We Are Modding A 32x ROM To Read DVD’s, If DVD’s Are Read At 32x Speed, It Can Cause Damage To Both DVD As Well As The CD-ROM, So We Need To Decrease The Speed.
Power Supplies Can Provide 5V [Red Wire] & 12V (Yellow Wire) Electricity Output For Molex Connectors. Find The Molex Connector You'll Plug Into The Modded CD-ROM Drive, Cut The Yellow Wire Or Insulate With Tape, So Only 5V Of Electricity Is Transferred To The CD-ROM Drive. The Speed Of The Drive Is Now 32 * 5/17 = 9.41x & Can Now FulFill Our Requirements.

Source: Varad’s Blog
Image Credits: http://www.cdrinfo.com/
READ MORE - Make Your CD-ROM Read DVD's

How To: Create a self updating banner

Oct 18, 2009

Create and customize an animated banner that cycles through your feed's five most recent items. It's an easy way to promote your content anywhere you can place a snippet of HTML. Most of you know what a banner is and where it is used, for those who are still not aware banner is an image that you most often keep in your signature purposefully to get more visitors (at least I do it)

To create a self updating banner which updates as soon as you update your website/blog follow the step below-


123


  • Now on right side just fill in asked details and you will get a new self updating banner, here is how I filled it


321


  • In clickthrough URL enter your Feed URL
  • Rest select as per you want.
  • Once you are done you will get something like this


11111


  • Now click on ACTIVATE, once you click on Activate the feed banner is saved and you will get a screen like below


111111111111111111

Here you can choose whatever option you like or you can just choose Give me code option to get the HTML code of the banner which you can use in Forums etc.

This is how my banner looks like
http://feeds.feedburner.com/blogspot/OgSz.gif?w=4&c=1&bb=0QE8

Tips n Tricks
READ MORE - How To: Create a self updating banner

How to figure out - 32 or 64 bit?

Oct 16, 2009

how to figure out if you have a 32 or 64-bit OS on your PC or Laptop? (under Vista/Windows 7)

Right click to “My Computer”, choose “Properties”


Under the System look for System Type:

1. If you see – 32 or there is no number of bits, then you use 32-bit system
2. If you see – 64 then you use 64-bit system.
READ MORE - How to figure out - 32 or 64 bit?

How To: Install Windows XP using Pen Drive

Oct 15, 2009

This tutorial is for those who wants to install XP using USB/Pen Drives. Though there are a lot of ways to do this but I choose the easiest one. For this you require following
  • USB/Pen Drive minimum 1GB
  • Windows 2000/XP/2003 CD or Installation Source
  • and finally WinSetupFromUSB.
How To:
1. Download WinSetupFromUSB and install it.
Setup - WinSetupFromUSB
2. Plug your Pen Drive.
3. The utility gives two options to format your USB
  • HP Format Tool – to format 2GB or above of partitions.
  • PEtoUSB – to format up to 2GB of partitions
Use as per your pen drive size.
Formatting USB Drive
4. Click Start to Format
5. Now Browse for CD/DVD source, see in picture below
WinSetupFromUSB 0.1.1
6. Keep rest of the part intact. Press Go button
7. When the first step completes and system reboots, select
 Windows 2000/XP/2003 Setup – First and Second Parts,
then Option 2 (second part) for the second stage of the setup.
DO NOT REMOVE THE USB PEN FROM USB PORT UNTIL YOU SEE THE WINDOWS START MENU
This article is taken from Windows Valley
READ MORE - How To: Install Windows XP using Pen Drive

How To: Identify a Font ?

Sep 25, 2009

Technorati Tags: ,

Seen a font in use and want to know what it is?
Submit an image to WhatTheFont to find the closest matches in their database.

If you visit a site and see some font that is great but don't know what it is this really does this well for you.

Tips for optimal results:

  • - Try to get the text as horizontal as possible.
  • - Letters should be around 100 pixels tall in your image
  • - Make sure letters aren't touching each other.


WhatTheFont! MyFonts

READ MORE - How To: Identify a Font ?

How To: Identify a Language of a webpage or app

Sep 20, 2009

Most of the free translations services available online ask you to select the language you want to translate a text from. This means that if you don't know what language it is you can not translate it in your language

Using LangID you can know in which language a text was written and then use an external service to translate it. The output of LangID is very simple they provide-
  1. English name of the language,
  2. the ISO code and
  3. an icon rapresenting the flag of one of the countries this language is spoken in

LangID uses Google Ajax API to identify the languages.
Currently they support 85 languages

How to use it-
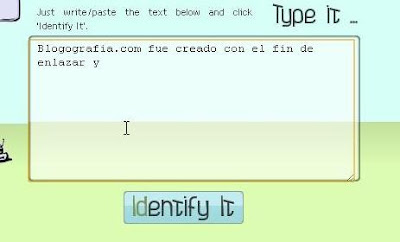
Just type the phrase or copy/paste from the webpage/application of which language you want to find out


and then click on Identify it button


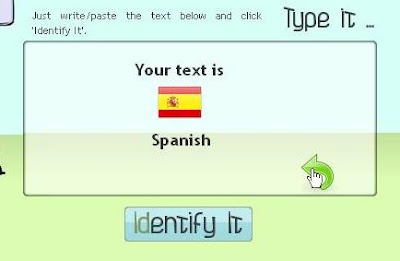
and here is the output.
READ MORE - How To: Identify a Language of a webpage or app

How To: Remove all ads from all sites

Sep 1, 2009

Almost every page today has got ads these days and most of them are powered by Google Adsense, Adbrite, Chitka etc...

I remember from the day I started using Internet from that day I hated these ads a lot, as they always redirect me to somewhere else and then I just roam here and there in between the ads.

I have found a lot of scripts addons to stop these ads for Firefox, Intenet Explorer, but never found any universal way to do that. One day I was reading some of my old articles and I found this How to: Block a website. This remind me of my tweaking days, so I taught why not try to remove ADs by using this technique.

First you need to know What is Windows Host File
The Windows Host File is a computer file used by an operating system to map hostnames to IP addresses. The hosts file is a plain-text file and is traditionally named hosts -WikiPedia

This file contains the mappings of IP addresses to host names. Each entry should be kept on an individual line. The IP address should be placed in the first column followed by the corresponding host name. The IP address and the host name should be separated by at least one space.

Additionally, comments may be inserted on individual lines or following the machine name denoted by a '#' symbol.

# 102.54.94.97 rhino.acme.com # source server

So by now you must have get an idea what is an Host file. You can view your Host file at C:\WINDOWS\SYSTEM32\DRIVERS\ETC > HOSTS.

Well there are a lot of uses of HOSTS file but in this tutorial I am concentrating on how to block ads using this host file. This is done by using a dummy address, or local host address typically 127.0.0.1, (which is in fact the address of your machine locally that's why it is called Local Host). For example, consider this entry:

127.0.0.1 wwww.yahoo.com

If this entry is saved in your host file then any reference to wwww.yahoo.com will be redirected to your own computer, and thus you are not able to visit Yahoo.com.

By further advancing this technique of blocking a site we will remove ads from all pages, lets know how. Now all you have to do is just follow these steps-

  • Go to C:\WINDOWS\SYSTEM32\DRIVERS\ETC
  • Open HOSTS file in Notepad
  • and after the line 127.0.0.1 localhost
  • Copy the following lines and save the file.


#GOOGLEADS
127.0.0.1 pagead.googlesyndication.com
127.0.0.1 pagead2.googlesyndication.com
127.0.0.1 googleads.g.doubleclick.net/
127.0.0.1 ad.doubleclick.net
#BIDVERTISER
127.0.0.1 bdv.bidvertiser.com
127.0.0.1 ads.bidvertiser.com
# ADBRITE
127.0.0.1 1.adbrite.com
127.0.0.1 2.adbrite.com
127.0.0.1 3.adbrite.com
127.0.0.1 4.adbrite.com
127.0.0.1 ads.adbrite.com
127.0.0.1 b1.adbrite.com
127.0.0.1 bstats.adbrite.com
127.0.0.1 click.adbrite.com
127.0.0.1 files.adbrite.com
127.0.0.1 pic.adbrite.com
127.0.0.1 vid.adbrite.com
127.0.0.1 site.www.adbrite.com
127.0.0.1 stats.adbrite.com
127.0.0.1 www.adbrite.com
127.0.0.1 adbrite.122.2o7.net
#CHITIKA
127.0.0.1 ads.chitika.net
127.0.0.1 ads1.chitika.net
127.0.0.1 blogads.chitika.net
127.0.0.1 ca.chitika.net
127.0.0.1 mm.chitika.net
127.0.0.1 parking.chitika.net
127.0.0.1 scripts.chitika.net
#ADTOLL
127.0.0.1 adserve.adtoll.com
#CLICKSOR
127.0.0.1 clicksor.com
127.0.0.1 ads.clicksor.com
127.0.0.1 main.clicksor.com
127.0.0.1 mci12.clicksor.com
127.0.0.1 search.clicksor.com
127.0.0.1 serw.clicksor.com
127.0.0.1 track.clicksor.com
127.0.0.1 www.clicksor.com
127.0.0.1 mp.clicksor.net
#YAHOO
127.0.0.1 adserver.yahoo.com
#TARGETPOINT
127.0.0.1 dev.targetpoint.com
127.0.0.1 srs.targetpoint.com
#FASTCLICK
127.0.0.1 fastclick.com
127.0.0.1 www.fastclick.com #[SunBelt.FastClick.com]
127.0.0.1 cdn.fastclick.net
127.0.0.1 code.fastclick.net
127.0.0.1 images.fastclick.net #[Panda.Spyware:Cookie/FastClick]
127.0.0.1 media.fastclick.net
127.0.0.1 secure.fastclick.net #[Tenebril.Tracking.Cookie]
127.0.0.1 sp.fastclick.net
127.0.0.1 fastclick.com.edgesuite.net #[a1795.g.akamai.net]
#BLOGADS
127.0.0.1 b.blogads.com
127.0.0.1 banners.blogads.com
127.0.0.1 c.blogads.com
127.0.0.1 cache.blogads.com
127.0.0.1 d.blogads.com
127.0.0.1 f.blogads.com
127.0.0.1 img.blogads.com
127.0.0.1 st.blogads.com #[WebBug]
127.0.0.1 stat.blogads.com #[WebBug]
127.0.0.1 weblog.blogads.com
127.0.0.1 z.blogads.com
127.0.0.1 www.blogads.com
#ATDMT
127.0.0.1 c.atdmt.com
127.0.0.1 click.atdmt.com #[McAfee.Cookie-Atdmt][Google.Diagnostic]
# 127.0.0.1 clk.atdmt.com #[disabled affects MS downloads]
127.0.0.1 ec.atdmt.com #[atlasdmt.vo.msecnd.net]
127.0.0.1 image.atdmt.com
127.0.0.1 ll.atdmt.com #[atlasdmt.vo.llnwd.net]
127.0.0.1 mir.atdmt.com #[p.mii.instacontent.net]
127.0.0.1 nc.atdmt.com #[EventTracking]
127.0.0.1 rmd.atdmt.com #[a898.x.akamai.net]
127.0.0.1 spd.atdmt.com #[a796.x.akamai.net]
127.0.0.1 spe.atdmt.com
127.0.0.1 srch.atdmt.com
# 127.0.0.1 switch.atdmt.com #[disabled affects Hotmail signup]
127.0.0.1 view.atdmt.com #[eTrust.Tracking.Cookie]
127.0.0.1 www.atdmt.com


These lines are sufficient to remove all types of ads from all sites you visit, but in case you think it is not sufficient visit the following link and copy paste it to the host file.

ADS LINK by MVPS.org
READ MORE - How To: Remove all ads from all sites

How To: Cross check your Antivirus

Aug 18, 2009

I just came across this tutorial on one of my friend Vicky's blog. He just wrote a tut on how to see whether your antivirus is working properly or not.


Here's how:

1. Open Notepad
2. Now copy the below code in the notepad :

X5O!P%@AP[4\PZX54(P^)7CC)7}$EICAR-STANDARD-ANTIVIRUS-TEST-FILE!$H+H*

Save the file as "virus.exe" with cotes
Now here goes the actual stuff, if your Anti Virus just delete this file immediately as soon as it is created than that means your AV is working properly.

But all of you will are not as Lucky as that, so better scan this file with your AV if it still not delete it than its time to update you AV.

Now the GEEK stuff

The file (in our case virus.exe) that we have created is known as The EICAR test file (official name: EICAR Standard Anti-Virus Test File) is a file, developed by the European Institute for Computer Antivirus Research, to test the response of computer antivirus (AV) programs.

The idea behind this is to allow people, companies, and AV programmers to test their software without having to use a real computer virus that could cause actual damage should the AV not respond correctly. - WikiPedia

Oh so that is for AntiVirus, so is there any such Geeky-Tricky stuff for AntiSpammers too?

Oh you are too curious and a real GEEKY guy if you are still reading till here, so for you, the answer is YES, like the above file you can also check you anti spammer by writing the following piece of code in notepad and saving it as Spam.exe

XJS*C4JDBQADN1.NSBN3*2IDNEN*GTUBE-STANDARD-ANTI-UBE-TEST-EMAIL*C.34X

If your Anti-Spammer immediately detects and delete it than it is working correctly and if not than you know what you have to do!

Now you must be curious to know what's this file called, OK it is The GTUBE (Generic Test for Unsolicited Bulk Email) is a 68-byte test string used to test anti-spam solutions, notably those based on SpamAssassin.

In SpamAssassin, it carries an antispam score of 1000 by default, which would be sufficient to trigger any installation. - WikiPedia


Image Credits:mobilecastle.biz
READ MORE - How To: Cross check your Antivirus

How To: Map Remap Keyboard Buttons

Aug 16, 2009

READ MORE - How To: Map Remap Keyboard Buttons

How to: Control cursor movement Without Mouse

You can control your mouse pointer with keyboard keys in windows.

You may have face problem when your mouse stop working then to move cursor is a big deal, you have to do all operations through keyboard. When your mouse stops working, you can enable this keyboard mouse feature. This keyboard mouse can performs all tasks of a normal mouse.

To activate the keyboard mouse follow given steps:
  • First you should log onto your computer with administrative rights.
  • To activate this feature, press Alt+Shift+NumLock keys at once and you will receive a small MouseKey box.
  • To keep MouseKeys on, click on Ok button or click on cancel button to cancel MouseKeys box.
  • Click on Settings button, if you want to adjust the mouse cursor detail settings.
  • Here a new dialog box will appear with the title Settings for MouseKeys”, now you can manage all mouse settings for example mouse cursor speed, acceleration and some other features.
Now using Numeric keypad, you can move your mouse pointer. The controls are:

  • 1,2,3,4,6,7,8 and 9 keys are used to move the mouse cursor into different directions.
  • Key 5 is used as mouse click button.
  • Insert key used to hold down mouse button.
  • + Sign used to double click on any object.
  • Delete button used to release the mouse.
  • Click on NumLock button to disable this keyboard mouse feature.
READ MORE - How to: Control cursor movement Without Mouse

How to: Create Skin for Window Media Player

Aug 13, 2009

Creating skin for media player is a very easy task and to create your first skin read the article here


View in full screen

Here is final output


Download Skin
Alternate Link for Skin

Download PDF
READ MORE - How to: Create Skin for Window Media Player

Show Blue Screen Of Death whenever you want

Aug 7, 2009

Well I know you are not going to use it anyway but this a small little prank that you can play with your friend. To show BSOD on your will follow these steps-

  • Open the Regedit (Start > Run and type in regedit)
  • NavigattoHKEY_LOCAL_MACHINE\SYSTEM\CurrentControlSet\Services\i8042prt\Parameters
  • Click on PollingIterations go to Edit > New > DWORD Value.
  • DWORD name: CrashOnCtrlScroll
  • Set its value:1 (enable).
  • Restart your computer!


Now whenever you want you can cause a BSOD, by just holding down the [Ctrl] key and than pressing SCROLL LOCK twice and you have your on-demand BSOD

Image Credits: www.pcstats.com
READ MORE - Show Blue Screen Of Death whenever you want

About Author

My photo
Working as an Automation Analyst, Ritesh is very passionate about developing tools and apps. His profile contains a long list of tools developed for Windows and apps for Android platform.