![]() This article was written to provide a step-by-step guide on how to correctly apply a new xml Blogger template to your blog. This process can be tricky depending on several factors (quality of the code in the new template, your existing widgets, etc) so you need to be careful when changing your template. Don’t worry though, just follow our step-by-step instructions below and we’ll hopefully get you through it without much pain.
This article was written to provide a step-by-step guide on how to correctly apply a new xml Blogger template to your blog. This process can be tricky depending on several factors (quality of the code in the new template, your existing widgets, etc) so you need to be careful when changing your template. Don’t worry though, just follow our step-by-step instructions below and we’ll hopefully get you through it without much pain. ![]()
Many people make the same mistake when installing a new blogger template. Most problems when installing a new template are caused by the blogger widgets (Page Elements) that you’ve spent time setting up in your previous template. Almost all Blogger templates available for download on this site are in the new Blogger xml template format so if you’ve downloaded the template from us, it’s going to be much easier to follow our instructions.
Step #1 - Backup Your Current Template
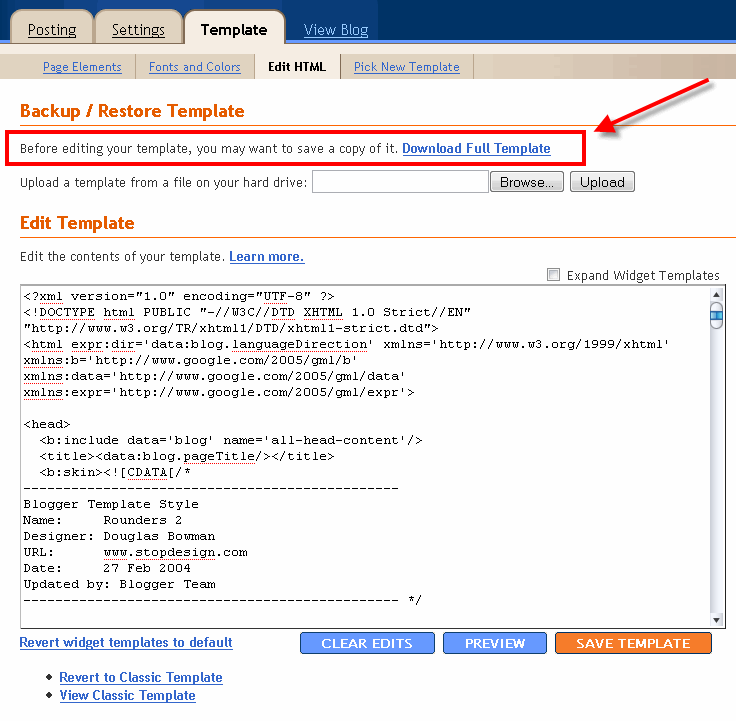 Backup your current Template just in case you make a mistake. This is very important so you can always go back (click on the screenshot to the left to see exactly how this is done). You’ll want to navigate to the “Template” => “Edit HTML” section of Blogger and then look for the “Before editing your template, you may want to save a copy of it. Download Full Template“. Click on the “Download Full Template” and save it somewhere easy to find later on your computer. We are not responsible for any mistakes you make in applying your new Blogger template. Once you have saved this .xml file onto your computer, move on to step #2.
Step #2 - Take a Screenshot of Your Page Elements
 This next step isn’t necessary but I like to do it anyhow. Take a screenshot of your “Page Elements” page just so you know exactly what widgets (Page Elements) you had before applying the new template (an example of the exact page you should take a screenshot of is in the image to the left). If you blow away all your widgets and you don’t remember which ones you had, this screenshot will at least help you remember. If you’re unsure as to how to take a screenshot, then check out this quick tutorial (MS Windows).
Step #3 - Upload Your New Blogger Template
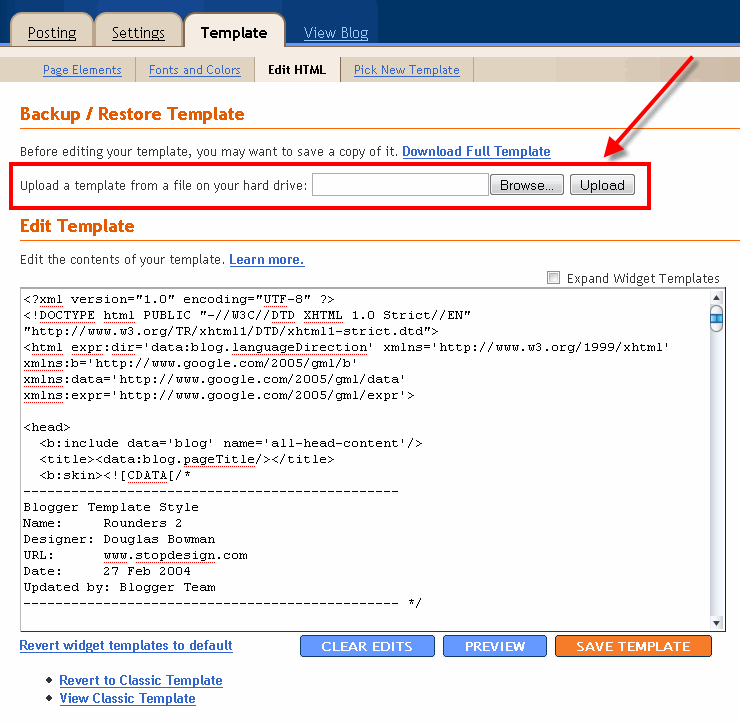 Now it’s time to upload the new Blogger template from your computer. You’ll want to navigate to the “Template” => “Edit HTML” section of Blogger and then look for the “Upload a template from a file on your hard drive:” text. To the right of that you’ll see two buttons. First, you’ll click on “Browse” and navigate to the new .xml Blogger template on your computer and click “Open”. Then you click on the “Upload” button and cross your fingers.
At this point Blogger is attempting to apply the new .xml Blogger template to your blog. After it’s done, you’ll get a message stating that the upload and new template was applied successfully (in that case you’re done!) or more likely in my case, you’ll get a red error message that states something like:
Widgets are about to be deleted
Please confirm that the following widgets should be deleted. All the widgets’ configuration data will be lost.
- Text1
- BloggerButton1
- Poll1
- Profile1
Now if you’re like me, you don’t want to lose all those widgets (Page Elements) you spent lots of time configuring and arranging on your blog. If you don’t care and really don’t have anything you’ll be upset losing, then go ahead and click on the “Confirm and Save” button that looks like this:![]()
Just remember, that you’ll need to re-add any page elements that you had previously setup in your old template. If they were simple or just recently added then I’d recommend just re-adding them instead of having to follow the next steps. If you decide you want to keep your widgets (Page Elements) then write down (or take another screenshot) the list mentioned above that are going to be deleted. You’ll use this list later when we migrate over your widgets.
0 comments:
Post a Comment